


The Art Of Hand Brushing!
With the increased use of sprayers to apply paint the use of brushing and rolling trim and cabinets has decreased over the years. Airless, HVLP, and Air Assisted Airless sprayers give you that automotive like finish when the prep is done right. Sprayers add speed, efficiency, quality finishes, so brushing and rolling is not necessary. Well not so fast as there is a time and place for everything.
Sprayers can be very expensive and not everyone can afford one. Sprayers take time and use to master, the substrate may not warrant spraying, conditions on occasion may not allow the use of spraying, architect specifications may dictate and hand finish. As you can see there simply may be a reason for you to hand brush and roll your cabinets and or trim. If that is the case I will give you some pointers that may help you achieve the professional finish that looks like a quality sprayed on finish.
To start off with you will only be as good as the coating and tools you use. And out of the two it probably is more important to your success to choose the right product to paint your trim or cabinets with. There are very few products on the market that will give you quality results and not leave excessive stippling and roping from the tools used. I recently had the opportunity to hand brush and roll an entire 1950’s duplex with Benjamin Moore Advance and the results were incredible.
The project had 70 year old trim, and cabinets that had been brushed and rolled at least 7 times from DIY home owners that left drips, runs, roping, stippling and adhesion issue. Setting up and spraying substrates with conditions like these will never give you a perfect flat finish. I was also working with many contractors who were coming and going so spraying and having dust, orders, and masking would have been a challenge that could not have been won, I also wanted to end result to have a professional quality hand brushed look to it as this would go with the style of the 1950’s home.
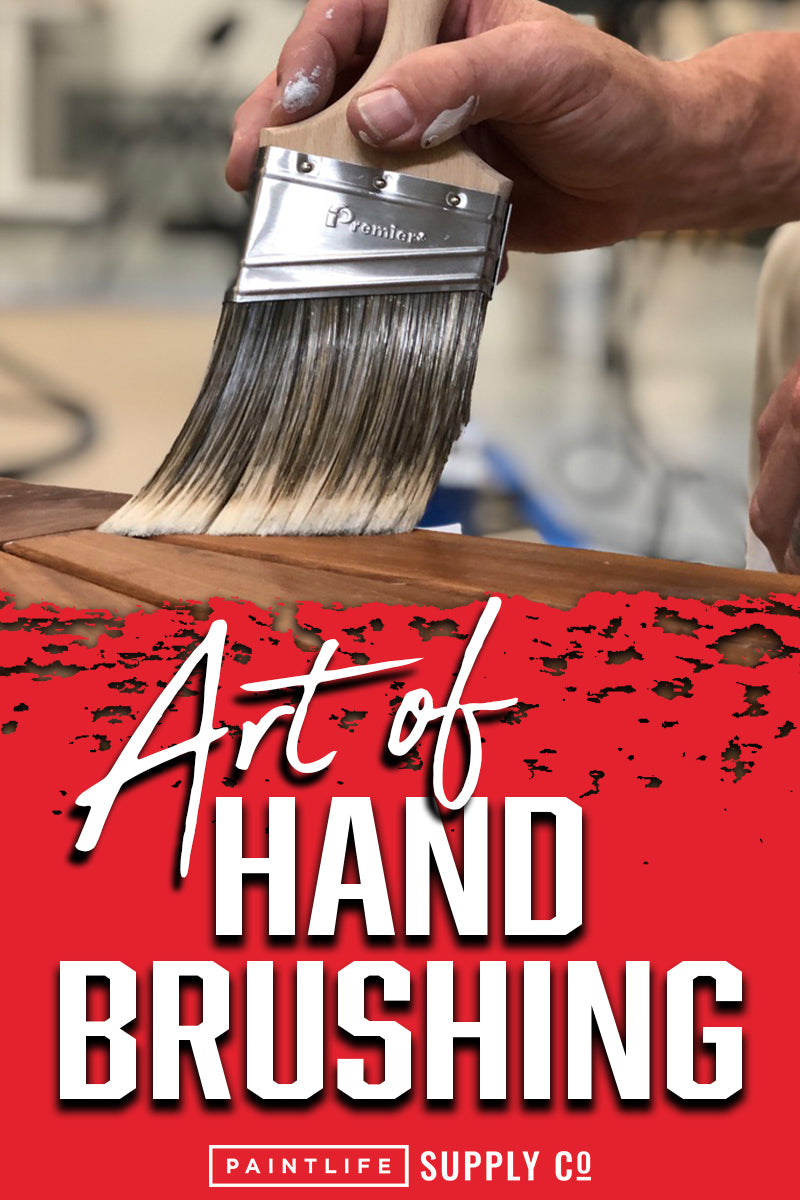
I had several choices of products to choose from that were designed to brush and roll but I did a survey and was amazed at how many professional painters used Benjamin Moore Advance so I had to see why. Along with a good paint you need good tools. A bad, low quality paint brush will make the painting slower, less efficient, messy, and will cause more roping then a brush designed to brush cabinets and trim. With thin paints that can be brushed and rolled you will want a nylon filament brush and better yet Duponts brand Tynex. Keeps it stiffness longer and cleans up easier. Premier makes a great brush for paints like ProClassic.
Paints that do not level or flow out as well are better served with softer filaments like Tynex. Benjamin Moore Advance has a higher viscosity so it is more difficult to brush with a softer brush. I choose to test a stiffer brush from Premier called the Malibu which is a blended Nylon Polyester brush with the same hand made quality as the Hampton. This was the right choice for brushing and laying out Advance. There are additives you can add to lower quality paints that do not have flow and leveling qualities necessary to get great results
XIM Latex Extender is one such product. Latex extenders slow dry time and aid in leveling the paint so you have less stippling and roping. Advance was designed so well that you do not need to thin and add anything to it to get amazing results. Advance is a water based latex oil modified urethane that bonds incredibly well to just about any surface you will be painting. Prep is still important thought,
To get the results I was after I started by sanding everything with my Ekasand 3X4 sander using 220 grit Ekasilk and Filmtek. After the initial sand I bondo and many imperfections as I could see then rolled and brushed a coat of Advance to get a good idea where the results were heading. I do using a 4” Premier Woven Pro paint roller that is lint free. There is nothing more frustrating then roller covers that leave little lints all over your finish that need to be sanded off, I use the roller simply to be faster and more efficient on flat areas. I roll on the paint then back brush it so it has the uniform hand brushed looks. The laying out with a brush or just brushing looks way better than the stippled look of a roller. No matter what paint you use there will always be some form of stippling or roping. It is inevitable.
The better engineered that paint is the better the result will be. Once dried and cured Advance almost looks like a sprayed on finish however, if you look in the right light or the right angle you can tell how the paint was applied. With the right tools it will look amazing. Advance was engineered for the DIYer and Pro who want to brush and roll and get good result but there are a few good practices to follow to ensure success,.
First off is the final lay off be a brush but the direction of the lay off matters. Advance hangs better than any paint I have ever brushed or sprayed on trim or cabinets. There are 2K poly’s that give amazing results spraying and brushing but have terrible hanging qualities which add to frustration for those with little experience painting. There is a learning curve. With Advance the learning curve is very short which I assume is by design if you are marketing your product the the DIYer.
Even though it hangs well you should always lay off the finish in an upward brush stroke which give the paint better changes to hand without runs. A little go a long way also. I like to get the Advance on and brush it out till I have a uniform amount of paint in the area I am working with then I do my layout. A stiffer brush like the Malibu help you manipulate the paint easier that a soft filament brush.
After my first coat I looked for more imperfection that I could eliminate with bondo glazing putty and sanding. Sounds long but this is a fast process. You have ask why not just sand it all down flat to begin with. 7 coats of paint and roping deep as the Grand Canyon would have made it a 3 month project and completely out of the home owners budget. Sometimes you just have to meet the customers expectations and budget. I repeated the process on more time that ended to doing a second coat over any bondo as you could very slightly see the red.
This brings up another quality with Advance I was amazed with. You can touch up right in the middle of a flat surface and to paint would level out and you could not even see where you did the touch up. Hence going back over any areas that had bondo on it. The end result had 4 coats of brushed paint that simply looked amazing. If you have a project that may need to be brushed and rolled I do highly recommend that you give Advance a try. Will all the positive here I will touch on the negative. The dry time is incredibly slow to sand and recoat. Well that is according the the TDS.
As many of you know I like to break all the rules and that I did with Advance. The dry and sand time is slow and so is the cure time. I recently did a vanity makeover and after 7 days scratched to face of one of the doors cause the coating was still not cure. Cautions your clients to be careful. You need to give it 30 days for a full cure but once cured the stuff is bullet proof. Sand time is pretty long also.
Advance has a sand time of 16 hours according to the TDS which is pretty excessive. Even after 16 hours it is still soft cause it is not cured and if you are not careful you will load your abrasive, heat up the coating, and could scar it requiring bondo and wet sanding to repair. With that said I was working on the front door of the 1950’s remodel and that would not work cause we had to hang the door at the end of every day.
Being one to push every coating to the limit and break every rule I noticed Advance would be dry to the touch in 1 hours. I would then take super fine Ekasilk 1/2” open celled abrasive and quickly sand with my Ekasand 3X4 sander. Move fast with little pressure and sanding would fine after only a 2 hour wait. These few negative that I have list may be game breakers but there really are not.
If you want a professional looking brushed on finish it will be a little give and take and slow dry times and sand times are a trade off. If you scratch, nick, or ding your finish within 30 days you have the security of knowing Advance touches up better then any paint I have ever used. Benjamin Moore truly nailed it with this casting so if you are in the market to brush and roll any trim or cabinets you need to give this product a try.